
How to Install and Create Mac OS X Lion GM/Retail on PC Hackintosh
Tried and Tested on my Dell Optiplex 330 PCRequirements:
1. Intel Base System
* Core 2 Duo
* At least 2GB RAM
* At least 256 VC
* 20GB Free space in HDD
2. A Copy of Mac OS X Lion GM or Retail (11A511 )
3. Mac PC/Macbook or Hackintosh PC running OS X Leopard or SL
4. USB Flash Drive 8GB or 16GB
Tools and Kext files needed:
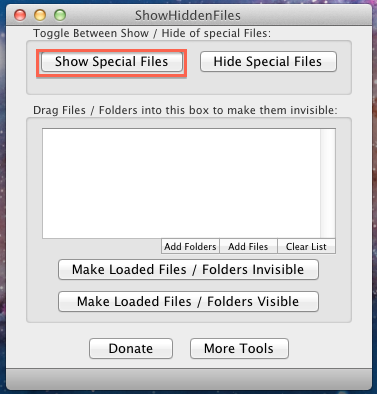
1. Show HiddenFiles : http://gotoes.org/sales/ShowHiddenFilesMacOSX/
2. Extra Lion.pkg : http://www.mediafire.com/?09zjtvcpqqpi9cg
3. Chameleon 2.0 RC5 -755.pkg : http://www.mediafire.com/?67ixrw6tjl55949
4. PCEFI 10.6 Lion+Snow : http://www.mediafire.com/?vec09o8nifdgq7n
5. Kext Files (Just extract it)
* ElliottForceLegacyRTC.kext
* fakesmc.kext
* NullCPUPowerManagement.kext
6. OSInstall patch : http://www.mediafire.com/?1ewwcu34f9uv7q7
7. OSInstall.mpkg : http://www.mediafire.com/?83998oh426rt34i
8. Kext Utility : http://www.mediafire.com/?868wkv2y3cmb7i1
First Step: Creating OS X Lion Hackintosh Installation Disk Image
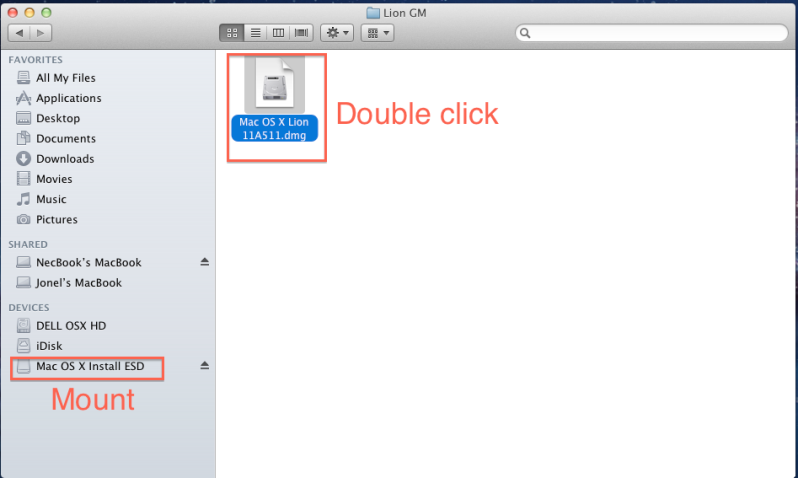
1. Double click/ Open and mount InstallESD.dmg (Lion GM/Retail Copy)
2. Run "Show HiddenFiles" = To see the hidden files that we need specially BaseSytem.dmg
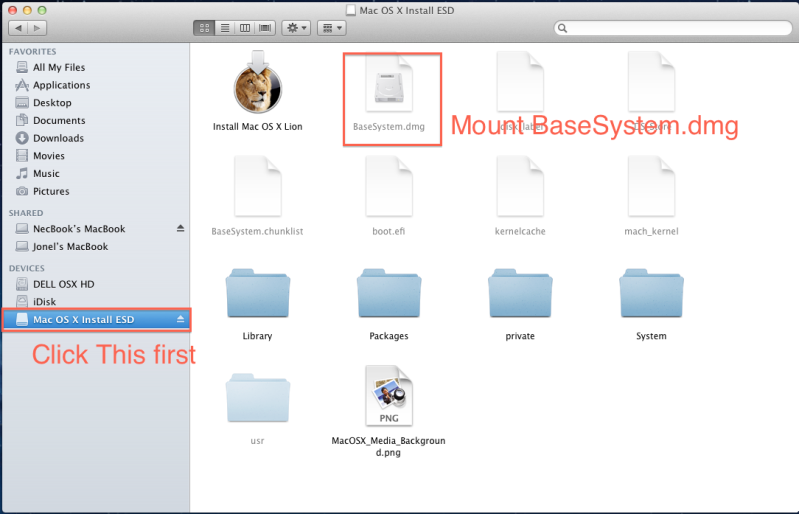
3. Find BaseSystem.dmg inside InstallESD.dmg
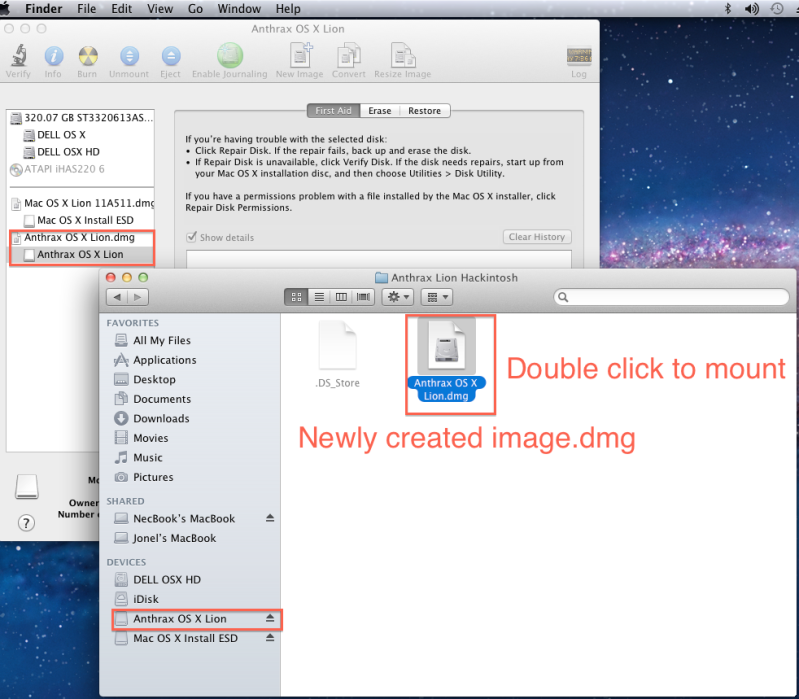
4. Mount BaseSystem.dmg (Double Click)
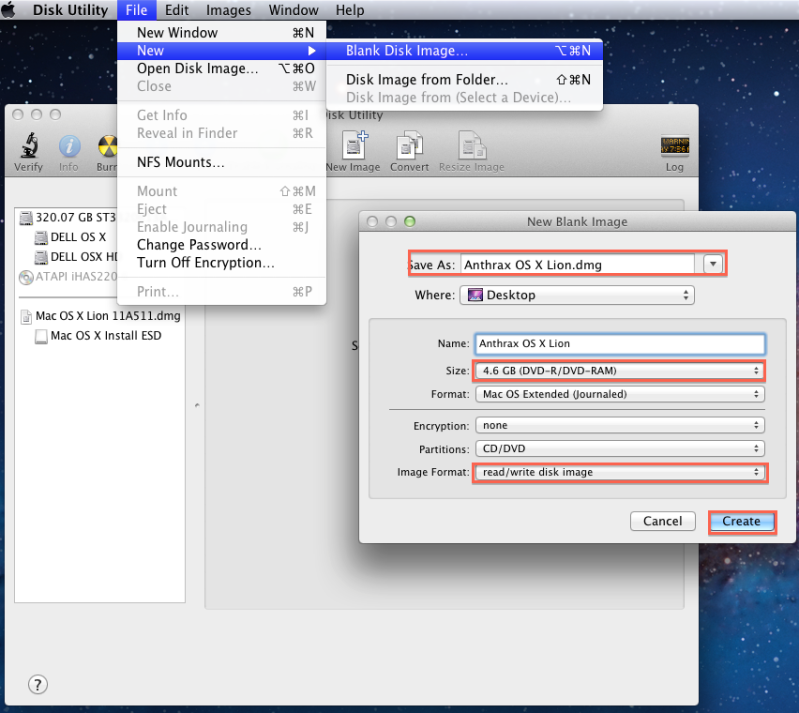
5. Open and Run Disk Utility and create a New image.dmg DVD 4.6 GB, read and write , and rename it like image.dmg (mine is Anthrax OS X Lion.dmg) Save it to Desktop or anywhere you want.
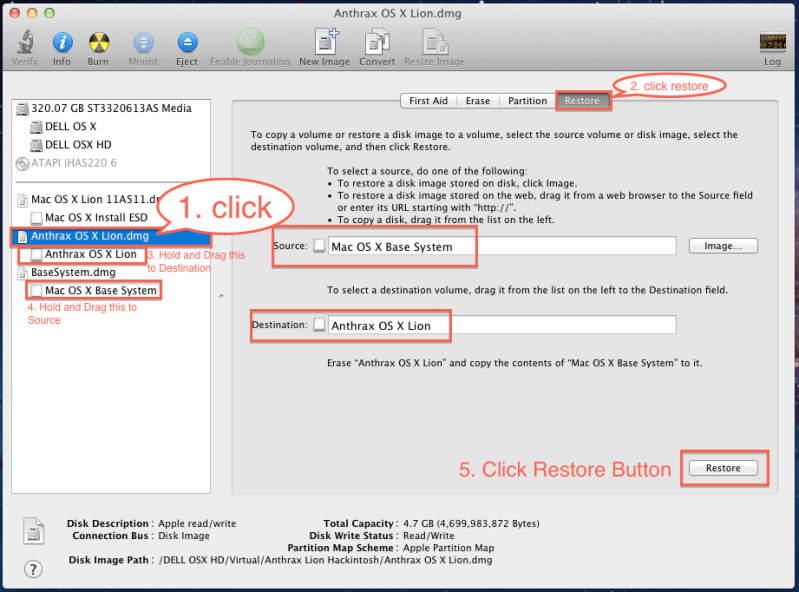
6. Make sure you mount your Newly created Image.dmg and Restore BaseSystem.dmg on new Image.dmg
7. After restore process complete:
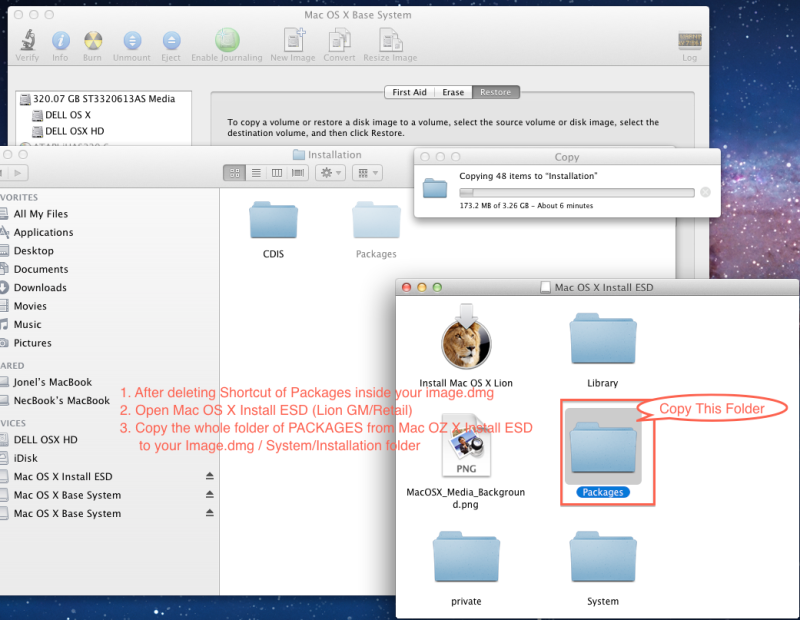
a. Delete packages Shortcut link inside your Image.dmg/System/Installation
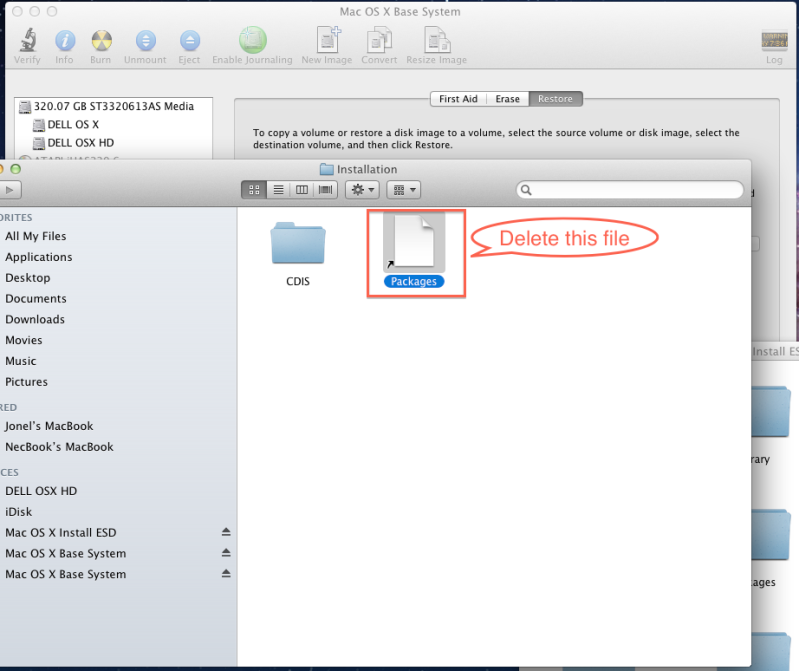
After you delete shortcut link of packages, Copy Packages folder from InstallESD.dmg to your Image.dmg
b. Copy Kexts Files (ElliottForceLegacyRTC.kext, fakesmc.kext, NullCPUPowerManagement.kext) on your Image.dmg (mine Anthrax OS X Lion.dmg) inside /System/Library/Extentions

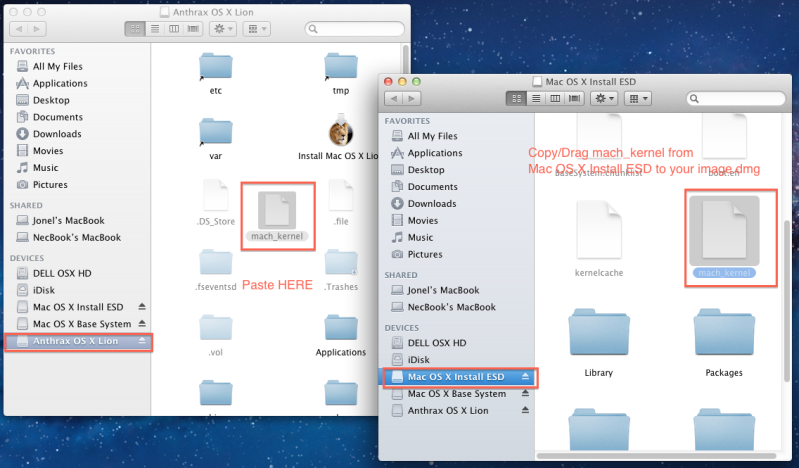
c. Copy Mach_Kernel from InstallESD.dmg to your Image.dmg
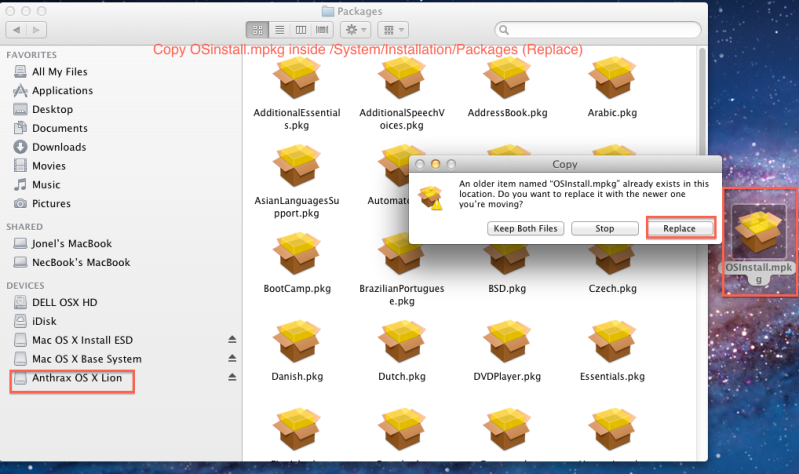
d. Copy OSinstall.mpkg inside /System/Installation/Packages (Replace)
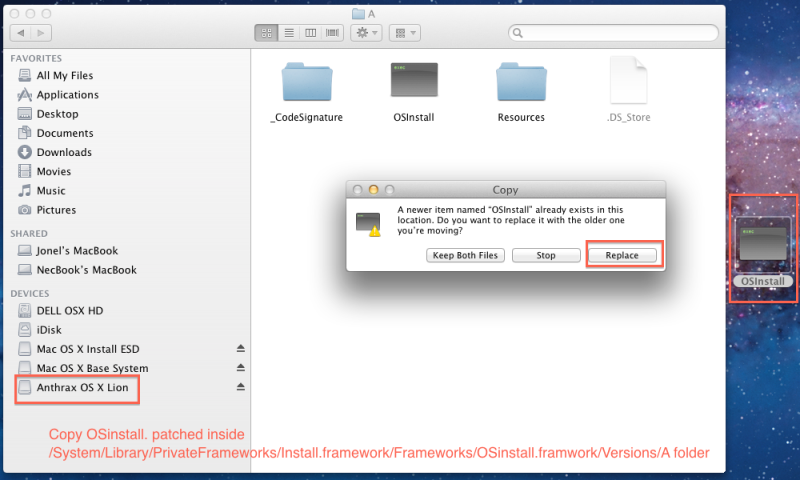
e. Copy OSinstall. patched inside /System/Library/PrivateFrameworks/Install.framework/Frameworks/OSinstall.framwork/Versions/A folder
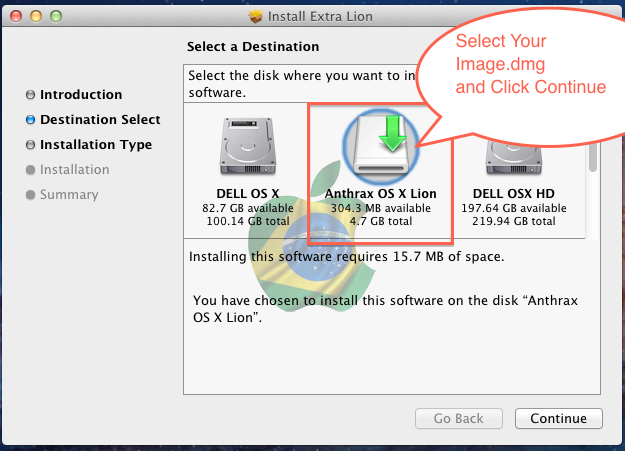
f. Install Extra Lion.pkg in your Image.dmg
(Run Extra Lion.pkg, click continue, click Change Install Location, click your Image.dmg and continue installation.)
g. Install Chameleon 2.0 RC5 -755.pkg
(Run Chameleon 2.0 RC5 -755.pkg, click continue, click Change Install Location, click your Image.dmg and continue installation.)
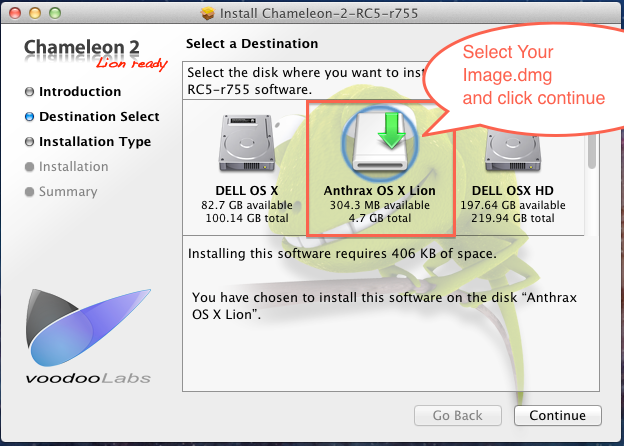
h. PCEFI 10.6 Lion+Snow.pkg (same procedure in f and g)
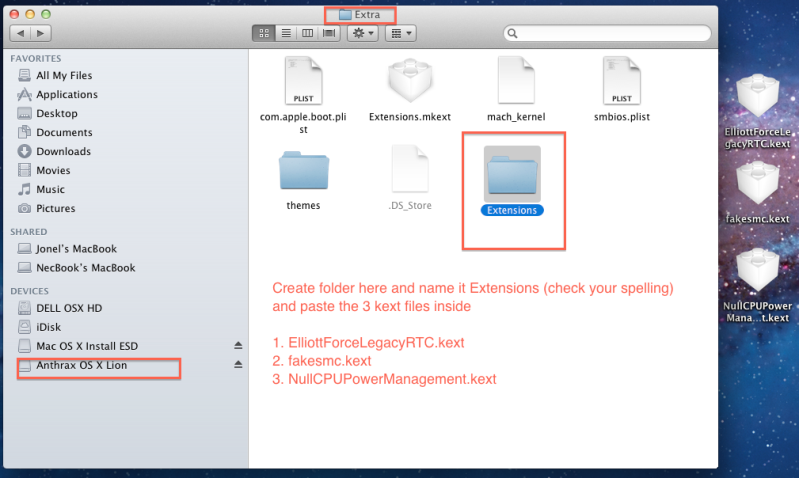
i. After you install "f , g, h" you can see a new folder inside your Image.dmg named "Extra", inside Extra folder create new folder and name it exactly "Extensions" folder and copy/paste (ElliottForceLegacyRTC.kext, fakesmc.kext, NullCPUPowerManagement.kext)
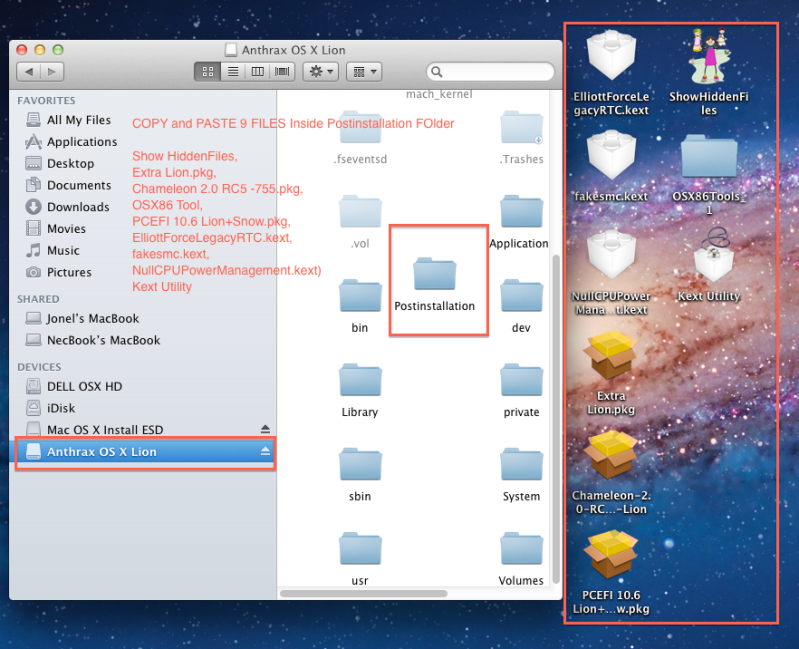
j. Create a folder "Postinstallation" inside Image.dmg and copy (Show HiddenFiles, Extra Lion.pkg, Chameleon 2.0 RC5 -755.pkg, OSX86 Tool, PCEFI 10.6 Lion+Snow.pkg, Kext Files (ElliottForceLegacyRTC.kext, fakesmc.kext, NullCPUPowerManagement.kext)
We can use those files after Installation of Lion and before we restart our computer.
Done (We can now unmount Install ESD.dmg and BaseSystem.dmg)
Second Step: Creating USB Bootable with Mac OS X Lion
1. Mount your Image.dmg (Mine Anthrax OS X Lion.dmg) This is what we've created earlier.
2. Plug your 8GB/16GB USB Flash Drive and Open/Run Disk Utility
3. Using Disk Utility erase USB Flash Drive (Mac OS Extended "journaled")
Rename it anything you want (Mine Anthrax Lion)

4. Using Disk Utility restore your Image.dmg to your USB Flash Drive

5. After restore completed, Install the following:

a. Install Extra_Lion.pkg to USB Flash Drive
b. Install Chameleon 2.0 RC5 -755.pkg to USB Flash Drive
c. Install PCEFI 10.6 Lion+Snow.pkg to USB Flash Drive
6. After you install "a , b, c" you can see a new folder inside your USB named "Extra", inside Extra folder create new folder and name it exactly "Extensions" folder and copy/paste (ElliottForceLegacyRTC.kext, fakesmc.kext, NullCPUPowerManagement.kext)
Done, you now have a Bootable USB Flash Drive with OS X Lion
Third Step: Installing Mac OS X Lion into your PC
1. Set your BIOS in first Boot priority in USB HDD
2. Plug your USB Bootable with Mac OS X Lion and start installation
3. At strt up page of installation, Using Disk Utility format your PC HDD. You can Use Format as Mac OS Extended (Journaled) or MBR (Mine MBR) and proceed Installation , It takes only 20-25 minutes to install.
4. After Installation Process it will ask you to restart. Restart your PC with USB HDD still plug-in.
5. Fill - up all details ask, Name Apple ID, add etc.. until installation process finish.
6. After Installation you are have now a running OS X Lion:
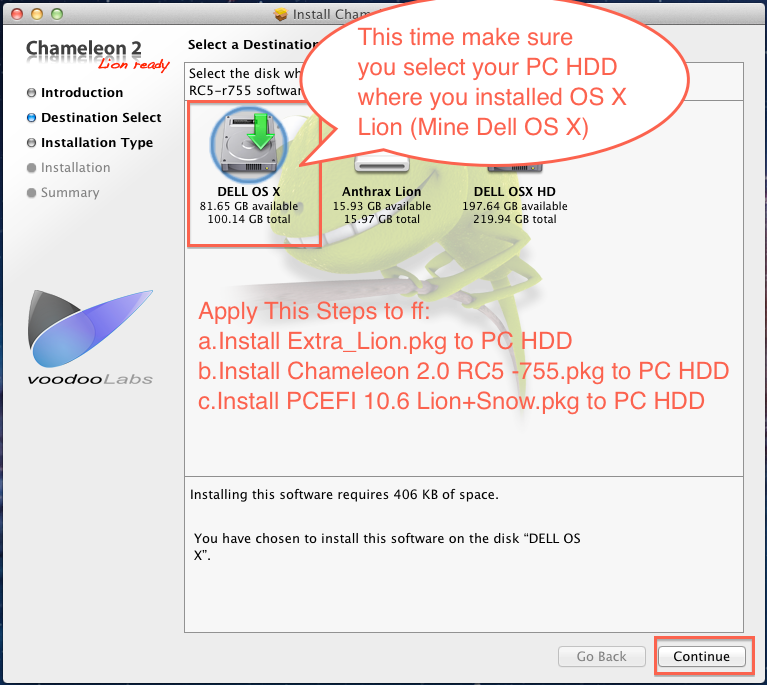
a. Install Extra_Lion.pkg to PC HDD
b. Install Chameleon 2.0 RC5 -755.pkg to PC HDD
c. Install PCEFI 10.6 Lion+Snow.pkg to PC HDD
7. After you install "a , b, c" you can see a new folder inside your PC HDD named "Extra", inside Extra folder create new folder and name it exactly "Extensions" folder and copy/paste (ElliottForceLegacyRTC.kext, fakesmc.kext, NullCPUPowerManagement.kext)
After this you can now remove USB HDD and restart/boot in your PC HDD anytime..
DONE..........Enjoy your Lion PC............
Heres my Desktop Screenshot:

Credits to: pippox0 of InfiniteMac